
As a Pilates instructor, I’ve worked with many women who wanted to regain strength and muscle tone after pregnancy. Some of them complained about abdominal pressure, pain or weakness even years after giving birth.
Others returned to class with their doctors’ blessings but received no further guidelines. And of the more than 30% of new moms who had Cesarean deliveries, including myself, many struggled longer than expected to “find” their abs again.
Table of Contents
- Core Changes During Pregnancy
- Post-Pregnancy Mistakes
- Core Exercise Program for Mothers
- Diastasis Recti
Core Changes During Pregnancy and Postpartum
First it’s important to understand how pregnancy affects the musculoskeletal system. As the belly expands, the abdominals stretch and the back muscles shorten. The connective tissue in the linea alba thins and separates (see Diastasis Recti sidebar). The ligaments and joints in the pelvis become very unstable. The pelvic floor often weakens under the weight of the fetus.
Even the diaphragm changes to accommodate the growing belly, affecting breath mechanics: The rib cage slides backward out of the way of the pregnancy resulting in short, shallow chest breaths.
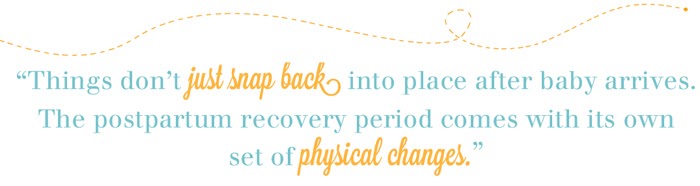
As Lauren Doss reminds us, in her blog on post-partum weight loss, things don’t just snap back into place after the baby arrives. The postpartum recovery period comes with its own set of physical changes. Many women are sedentary for months as they recover from delivery, which creates even more tightness and weakness. Nursing, lifting and carrying a baby can lead to kyphosis.
When all of these physical changes combine in pregnancy and beyond, “There’s a big change in how the muscles interrelate and how women coordinate all their muscles,” explains Julie Wiebe, BSc, MPT, a physical therapist who specializes in post-pregnancy. “You can have a super strong abdomen and still have poor core stability.” Getting back into shape postpartum is not just about strength—the goal should be proper function and core stability.
Don’t Make These POST-PREGNANCY EXERCISE Mistakes
Pushing too soon.
Most doctors will advise women to recover for 4 to 8 weeks before resuming exercise, but the American College of Obstetricians and Gynecologists (ACOG) says it’s OK to gradually resume exercising postpartum when mom feels up to it. “Each woman has her own unique recovery span,” explains Catherine Cram, MS, co-author of Exercising Through Your Pregnancy (Addicus Books, 2012) and creator of the Prenatal and Postpartum Exercise Design course for DSWFitness. “Her body’s signals should determine when to start exercising.
Remember that increased bright red vaginal bleeding after exercise is a sign that her body isn’t recovered sufficiently or that she pushed too hard, too fast,” says Cram. Encourage your client to check with her doctor before beginning any type of activity.
“For months, she will still be sleep deprived, sore and perhaps a little ‘blue’ or overwhelmed,” notes Patricia Friberg, creator of the Belly Beautiful® Workout prenatal and postnatal DVDs. Easing back into exercise gradually should leave her feeling invigorated—not depleted.
Ignoring poor form.
All the physical changes of pregnancy often cause women to compensate by creating entirely new movement patterns, explains Wiebe. The muscles that became weakened, tightened and overstretched during pregnancy affect alignment and form postpartum, too. Trainers must be diligent about recognizing poor form on any exercise (like squats or other form-intensive movements) and intervene to correct it.
All trainers should also do adequate movement assessments to enable correct movements for any post-natal clients.
Another thing to watch for? Breathing. “If your client has to hold her breath or use poor form to perform any exercise, the challenge is too great,” advises Wiebe.
Not seeing a specialist.
Is your client leaking urine during activities? Is she experiencing pain in her hips, abdomen or Cesarean incision? Has her postpartum bleeding increased during or after exercise? These are just a few signs that her system isn’t functioning well. If you feel out of your realm of expertise, do not hesitate to refer a client to her doctor or a physical therapist that specializes in pelvic floor or postpartum rehabilitation. (Search APTA.org for a “women’s health” specialty PT.)
Over-crunching.
“I do not recommend any crunches or spinal flexion exercises for postnatal fitness in the first six months or until any issues with diastasis or pelvic floor dysfunction are resolved,” says Suzanne Bowen, Pilates expert and creator of BarreAmped. These exercises are often done erratically or excessively, Bowen observes, which can exacerbate existing problems. Crunches (spinal flexion) only strengthen the rectus abdominis and can worsen diastasis.
Instead, “You need to work on both strength and muscle coordination for the entire system simultaneously,” suggests Wiebe. “If you haven’t restored coordination, you’re only strengthening an uncoordinated system, which can have disastrous effects.” The key is to do exercises that safely help stabilize the pelvis and midsection.
A Progressive postpartum Core Program
Cram recommends the following exercises, developed by physical therapist Shirley Sahrmann. These crunch-free moves improve strength, stability and coordination. Your client should master the form and number of reps listed for each exercise before progressing to the next one. Be sure your client has her doctor’s approval before starting this plan.
1. Basic Breath:
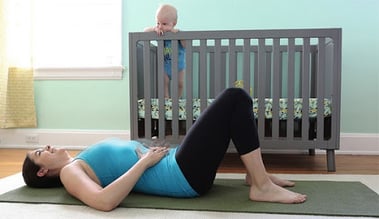
“Right off the bat, women need to learn to breathe,” Bowen advises. “Proper breath is a core exercise [that can always be applied].” Work on deep diaphragmatic breaths that can be performed lying, sitting or standing: Begin in a neutral spine. As mom breathes in, she feels pelvic floor (Kegels), rib cage and abs descend or open.
As the client exhales, she lifts the pelvic floor, pulls the abdomen in and closes the rib cage and holds for 5 seconds. Work up to 5 to 10 breaths with abdominal contractions several times per day. When she is able to contract and relax the abdominal muscles without moving her spine, she can move to the next level.
2. Heel Slides:
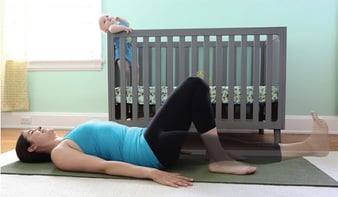 Lie on the floor with knees bent, spine neutral and arms at sides. Begin with the basic breath (exercise 1) to engage the abs. Instruct her to slowly slide one leg out (inhaling) until it is parallel to the floor, and then exhale as she slides it back in to the starting position. Alternate sides, extending the other leg out and then back in to complete one rep.
Her back should remain neutral throughout this exercise. When she can comfortably perform 20 heel slides on each leg she can move to the next level.
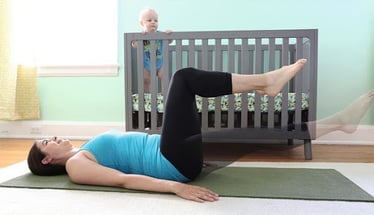
3. Leg Extensions:
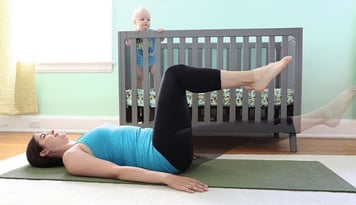
Lie on the floor with knees bent, spine neutral and arms at sides. Begin with the basic breath (exercise 1) to engage the abs. Exhale to raise one leg to tabletop position (knee in line with hip, shin parallel to the floor). Inhale to slowly extend the lifted leg out as close to the floor as she can without arching her back. Instruct client to exhale and return leg to tabletop position, then bring foot back down to the starting position.
Switch sides. Progress over time until she can extend/hover her leg about 2 to 3 inches above the floor (without touching it). Work up to five repetitions on each side without stopping, building to 20 hovering repetitions on each side before she moves to the next level.
4. Toe Taps:
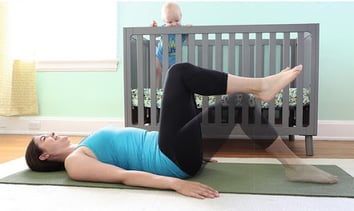
Lie on the floor with knees bent, spine neutral and arms at sides. Begin with the basic breath (exercise 1) to engage the abs. Then exhale to bring legs up one at a time to tabletop position. Keeping knee bent, slowly lower one foot down to the floor on an inhale, then exhale to return to tabletop. Repeat on the opposite side, working up to 10 controlled repetitions on each leg (with no changes in lower back position) before moving on to the next level.
5. Advanced Leg Extensions:
Lie on the floor with knees bent, spine neutral and arms at sides. Begin with the basic breath (exercise 1) to engage the abs. Then exhale to bring legs up one at a time to tabletop position. Inhaling, slowly extend one leg parallel to the floor without touching it. Exhale to return the leg to the starting position and switch sides. (If she arches her back at all during the exercise, she isn’t strong enough to progress to this level, and should return to the previous exercise.)
Work up to 10 repetitions each leg to start. When she can repeat this exercise 20 times on each leg without discomfort or arching her back, she can move to the final level.
6. Double Leg Lowers:
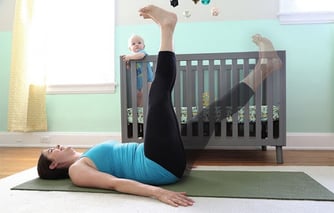
Lie on the floor with knees bent, spine neutral and arms at sides. Begin with the basic breath (exercise 1) to engage the abs. Then exhale to bring legs up one at a time to tabletop position. Squeeze legs together, extend legs up in line with hips.
On inhale, slowly lower both legs toward the floor as far as she comfortably can without moving her lower back. Exhale and contract the abs to lift legs back up to the start position. Work up to 20 repetitions. (If she notices back pain during this exercise, return to the previous level.)
In Closing
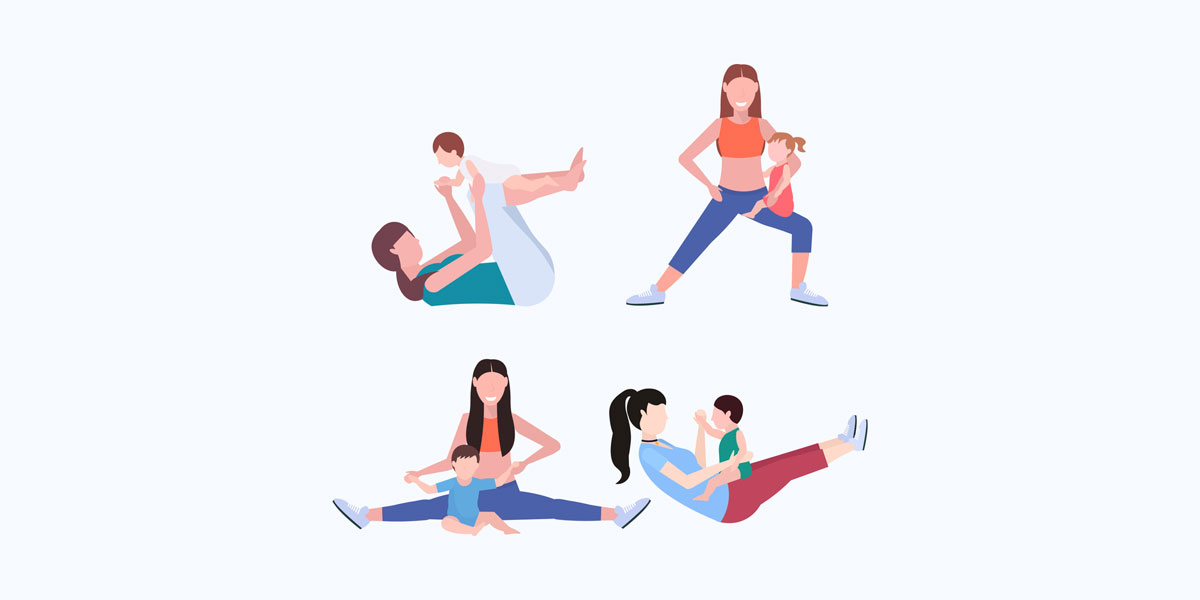
The most important thing to help your students remember is that they can rehabilitate their core during every movement throughout the day—even while sitting. Encourage mom to be mindful of her body while she cares for her baby, to breathe with intention, to sit and stand with good posture and alignment.
Remind her to capture every moment as a chance to coordinate and strengthen her system—every time she squats to pick up a toy or even walks to the nursery can be a core exercise. “It doesn’t only happen at the gym,” says Wiebe. “It happens over time by using the whole system functionally throughout the day.”
Diastasis Recti
Diastasis recti is a separation of the right and left abdominal muscles due to the natural belly growth from the developing fetus. It usually takes four to eight weeks after giving birth for the gap to close, according to Teri Jory, PhD, creator of the POISE core training system. Performing abdominal exercises with diastasis present can further injure the abdominal muscles.
Here’s how Jory suggests you instruct your client to check for diastasis:
1. Lie flat on your back with knees bent.
2. Place the fingers of your left hand, fingertips facing you, just above your belly button. Place right hand on upper thigh.
3. Inhale. As you exhale, lift your head and shoulders off the floor and slide your right hand down your thigh toward your knee. This will make your abdominal muscles tighten. Use left fingers to feel the width of gap.
< 2 fingers wide: No diastasis is present.
2 to 3 fingers wide: Diastasis is present.
> 4 to 5 fingers wide: Severe diastasis that might require specialized physical therapy.
If Diastasis Is Present
While the exercises in this article are appropriate for diastasis recti, “Women with severe diastasis recti are in the greatest need of starting an abdominal rehabilitation program as early as possible,” warns Cram. Do not start abdominal or any other exercises until your client sees a physical therapist.
Avoid all spinal extension, deep spinal flexion (crunches) and spinal rotation. Instead, opt for functional abdominal work like squats while cueing to engage the abs, suggests Wiebe.
Check this out: For an additional perspective on diastasis recti, read: How to Prevent Diastasis Recti with Crunches.