

If you’re like the millions of people who use electronic tools such as a cell phone, tablet, laptop or desk computer, you’ve probably spent hours upon hours looking at the screen with your head jutted forward - as is common with a forward head posture. Other situations that might have you holding your head forward of your shoulders include reading books, significant time behind the steering wheel or watching TV.
Whatever the cause, the migration of your head to this forward position can ultimately lead to overactive muscles and a complementing set of underactive muscles. This postural distortion pattern, known as upper crossed syndrome (UCS), can result in imbalances of muscle tone or timing, often leading to poor movement patterns, and in this tech heavy society, increased stress on the head, neck and shoulder joints.
Poor posture at any level may lead to muscle imbalances. This can have a trickle-down effect into the rest of the body, not just in the local areas of the neck and shoulders. An associated sequence of muscle imbalances in the hip region, referred to as lower crossed syndrome, can oftentimes be observed in conjunction with upper crossed syndrome.
When looking for long-term success in relieving UCS, identifying and addressing postural issues that could exist elsewhere in the body will also be needed. This total-body approach will relieve tensions through the entire kinetic chain, while also enhancing desired results. It is also go-to for movement experts in the fitness industry.
Meanings of ‘Crossed’ and ‘Countercrossed’
The “crossed” in upper crossed syndrome refers to the crossing pattern of the overactive muscles with the countercrossing of the underactive muscles. When viewed from the side, an X pattern can be drawn for these two sets of muscles. The overactive muscles form a diagonal pattern from the posterior neck with the upper trapezius and levators down and across to the anterior neck and shoulder with the sternocleidomastoid (SCM) and pectoralis major.
The other side of the X now depicts the underactive muscles, with the deep cervical flexors down toward the mid/lower trapezius, rhomboids and serratus anterior. As we continually assume the seated, forward head postures driven by electronic devices or poor exercise selection and technique, this X pattern of muscle imbalances will increase.
Identify Imbalances
When working with clients or performing your own workout routine, attaining and maintaining ideal posture is paramount to a safe and effective program. In order to address postural or movement imbalances, the less-than-ideal posture has to be identified and a corrective exercise strategy developed.This corrective program can have two applications. First, it can serve as a stand-alone phase of training that will help the client achieve better postural control and endurance. Second, it can be applied as the movement preparation for a workout.
In the first application, the client may be in a post-rehabilitation situation and need a program that incorporates flexibility with local and integrated strengthening. The second application will most likely be for the client looking to move better and improve coordination before applying speed and increased force during their workout session.
The first step to improving any postural distortion pattern is being able to identify the condition. Upper crossed syndrome can be observed from different vantage points with different motions. Some basic assessments that can be implemented to identify distortion patterns are gait observations, overhead squat, pushing and pulling motions, and static posture analysis. With any postural assessment—static, dynamic or transitional—UCS can be observed by watching head position relative to the shoulders, and the arms and shoulder blades relative to the ribs.
By using the landmarks of the ears, shoulders and the glenohumeral (GH) joint, a static posture assessment can identify UCS by observing if the ears are forward of the shoulder. You might even say that this person is slouching.
Observations for the shoulder blade and the upper arm can be seen from the front and side views with the overhead squat, pushing (pushup) and pulling (cable row) motions. The movements to note during an overhead squat assessment for possible signs of UCS include:
- Arms falling forward or to side during the descent
- Head migrating forward
- Elevating or elevated shoulder blades
- Elbows flexed or challenged in keeping arms straight
Depending on the extent of the distortion, someone may exhibit one or more of the listed movement compensations. Combining the different assessments can also confirm findings. This helps in prioritizing the corrective strategies during program design.
Assessment results (upper body compensation observations only)
Overhead Squat (OHS)
- Head: Forward
- Arms: Elbows fall to side, elbows flex
Pushing (Standing Cable Chest Press)
- Head: Forward
- Shoulders: Elevated
Pulling (Standing Cable Row)
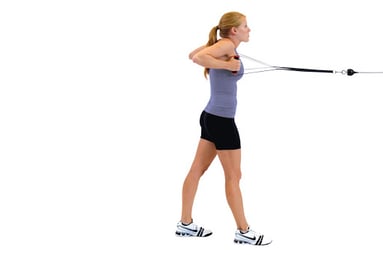
- Head: forward
- Shoulders: Elevated
Possible Overactive Muscles
- Sternocleidomastoid (SCM), Levator Scapulae, Upper Trapezius
Possible Underactive Muscles
- Deep Cervical Flexors, Lower Trapezius
Corrective Exercise as a Solution
Assessment(s) results can now be applied to design a program. The four-step corrective exercise process for upper crossed syndrome starts by inhibiting or relaxing the possible overactive muscles (usually through foam rolling), lengthening these same muscles, followed by strengthening the complementing underactive muscles, and finally, integrating the involved muscles to reestablish functional synergistic movement patterns.
This four-step process of establishing a more ideal posture is a way of re-educating the body and in this case, the upper body. Generally this corrective strategy works to increase range of motion, to improve local strength, and to assist the client in learning to better control the newfound range of motion. Added benefits also include a possible decrease in pain and discomfort, stability of the upper torso, and improved physical performance in training and in play. When the head, neck and shoulders are functioning better, so does the rest of the body.
For more information on the NASM Corrective Exercise approach, visit our informational page on the specialization.
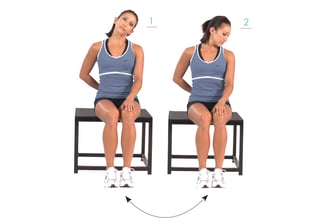
Step 1: INHIBIT/SELF-MYOFASCIAL RELEASE OVERACTIVE MUSCLES
Upper Trapezius,
Levator Scapulae, SCM
Hold pressure on tender spots for 30 seconds.
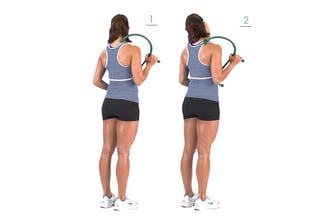
Step 2: LENGTHEN/ STATIC STRETCH
Upper Trapezius
Tuck chin and slowly draw left ear to left shoulder.
Levator Scapulae
Continue by rotating chin downward until a slight stretch is felt on the right side.
SCM
Same as above, except rotate chin upward.
Perform the sequence on both sides, holding each stretch position for 20–30 seconds.
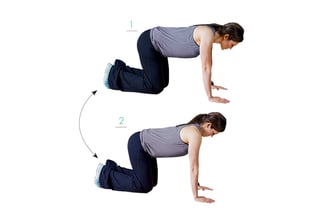
Step 3: ACTIVATE/STRENGTHEN
Chin Tucks
- Get on hands and knees with back straight and head in line with spine. Extend chin toward the floor.
- Scoop chin down toward chest as far as possible (like nodding “yes”). Keeping chin close to body, slide back into the starting position.
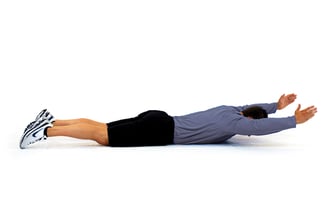
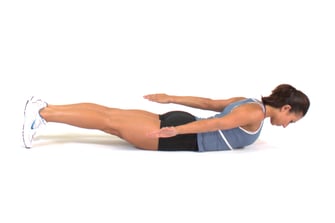
Floor Cobra
- Lie on the floor, arms at side of body (or with arms in front of body in a “Superman” position), palms facing toward ground.
- Pinch shoulder blades together and lift chest off the floor. Hold for 2 seconds. Slowly return body to the ground, keeping chin tucked.
Check out floor cobra demo here.
Step 4: Integrate
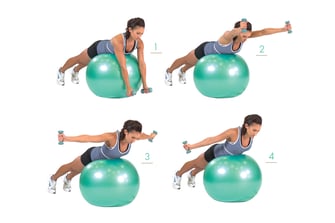
Ball Combination
- Lie with abdomen on a stability ball, keeping feet pointed down and legs straight. Hold a dumbbell in each hand.
- Lift chest off the ball, keeping back and neck in proper alignment. Extend arms in front of body. Squeeze glutes and lift arms, keeping thumbs up and pinching shoulder blades back and down (scaption).
- Move arms straight out to side with thumbs up (abduction).
- Move arms to the side of the body with thumbs up, retract and depress shoulder blades (cobra).
Hold briefly at each location, then return arms to extended position in front of body (position 2). Repeat 10–15 times, for 1–2 sets.